Check a mattress for bed bugs by stripping bedding and inspecting seams, edges, tags, tufts, and the underside. Use a flashlight and a flat card to pry and reveal hiding spots. Look for dark fecal spots, shed skins, tiny white eggs, and live reddish-brown bugs. Focus on mattress seams, box spring, bed frame joints, and nearby furniture. Quick, careful checks catch infestations early and guide the next steps.
How to Check a Mattress for Bed Bugs
Before you panic, take a slow, careful look at the mattress itself, because bed bugs usually hide where you sleep most.
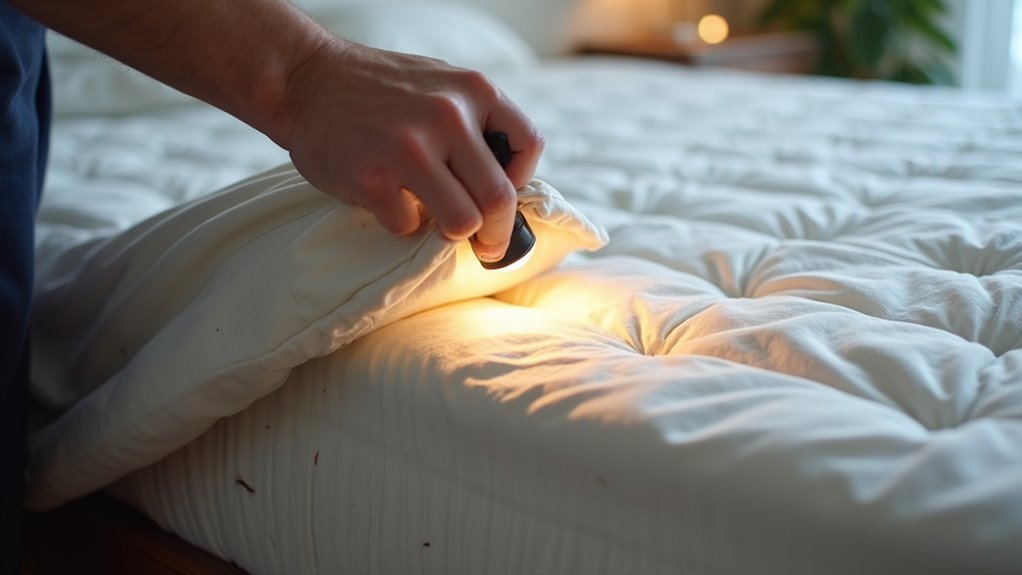
Strip off all bedding initially, then use a flashlight to check seams, piping, tags, corners, and folds. A magnifying glass helps you see tiny eggs or shed skins, and a credit card can slide through crevices to expose anything tucked away.
Move methodically around the edges, then flip the mattress and inspect the underside too.
Should you spot debris, stay calm and keep going with your laundry protocol for the bedding and your travel precautions for bags and clothes.
A white sheet under the mattress can help you notice falling specks.
You’re not alone in this, and a careful check gives you a stronger next step.
Spot the First Bed Bug Signs
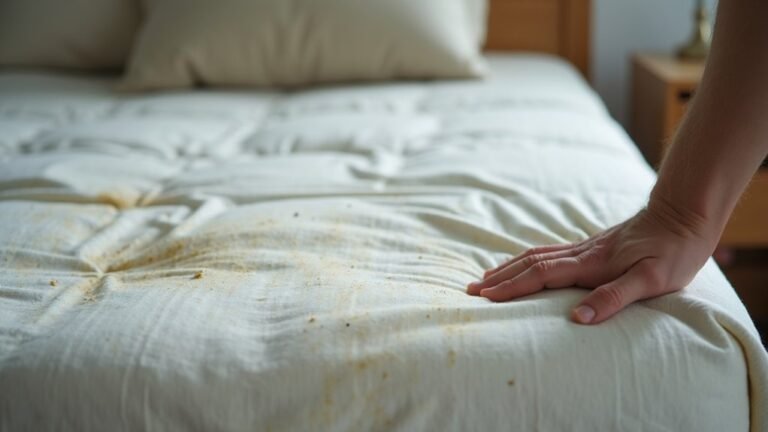
Start initially looking for dark spots on the mattress, since bed bug waste often leaves small black or rust-colored marks.
Then check the seams, folds, and piping closely, because bugs hide in those tight edges primarily.
Should you spot pale shed skins near those areas, that’s another strong clue that you’re not contending with a random stain.
Look For Dark Spots
Dark spots are often the initial clue that bed bugs have made themselves at home, so pay close attention to any tiny black or dark rust-brown marks on the mattress. These stains can sit on the mattress fabric like ink dots, and they might smear a little when you touch them with a damp cloth. Use a flashlight and check the top, bottom, and edges slowly.
| Clue | What it could indicate |
|---|---|
| Black specks | Bug waste |
| Rust-brown dots | Old feeding stains |
| Smears | Active signs |
| Tiny clusters | More than one bug |
When you spot them, don’t panic. You’re not alone, and you can still take the next step with confidence. Keep the area calm, then record where the marks appear. Laundry treatments on nearby bedding can help limit spread while you keep looking.
Check Mattress Seams
Run your hand slowly along the mattress seams, because this is where bed bugs often leave their initial real clues. Use a flashlight and a credit card edge to open tight folds, then check for dark specks, tiny blood marks, or live bugs tucked beside the stitching patterns.
Pay close attention to tags, piping, buttons, and zipper areas, since these spots trap heat and shelter insects. Should your mattress have fabric adhesives, inspect those edges too, because small gaps can hide movement.
Move around every corner and the full perimeter, and don’t rush the underside seams either. A magnifying glass can help you spot faint signs without strain. You’re not looking for perfection here, just the small warnings that help your room feel safe again.
Spot Shed Skins
Bed bug shed skins can be easier to spot than the live bugs themselves, and that’s a relief whenever you’re trying to confirm what’s going on.
You’ll usually find these pale, empty shells along seams, corners, and tags, where bugs like to hide. Look closely with a flashlight, and use a magnifier should you need help seeing tiny details. Shed skins often sit near dark specks or blood marks, so keep scanning the same spot.
In case you’ve already stripped old bedding, check it too, because loose skins can fall there. Also, follow your laundry protocols so you don’t carry anything back into clean rooms.
Whenever you notice one shell, stay calm. It means you’ve found a real clue, and now you can keep checking with confidence and care.
Strip the Bed and Inspect Seams
Start removing the bed down to the bare mattress so you can see what’s really going on. Strip off sheets, blankets, and protectors, then grab a flashlight. You’re not alone in this; a careful check gives you real peace of mind.
Next, inspect each seam with slow, steady passes. Use a card to open tight folds, and watch for dark spots, tiny eggs, or live bugs.
- Check the long side seams initially.
- Move to the corners and every fold.
- Flip the mattress and repeat on the underside.
Should the seam look torn, take note of it for seam repair techniques after you finish. Also, in case you rotate the mattress often, keep this step in your routine so nothing gets missed.
Check Piping, Tags, and Tufts
Next, you should check the mattress piping, since bed bugs often hide in that narrow edge where fabric folds over.
Then look closely at tags and tufts, because these small spots can hold eggs, shed skins, or live bugs that you could overlook on initial inspection.
A flashlight and a steady hand will help you spot anything tucked deep in those tight places.
Inspect Mattress Piping
Trace the seam where the mattress folds, because piping, tags, and tufts are some of bed bugs’ favorite hiding places. You’re not alone in this search. With a flashlight and a steady hand, run a threaded inspection along the piping and use a flat card to lift the edge. That small move can reveal eggs, shed skins, or live bugs tucked tight against the fabric.
For better piping maintenance, check the whole edge in order:
- Start at one corner and follow the seam.
- Press gently where the piping bends or loosens.
- Watch for dark specks or tiny rust spots.
Move slowly, and inspect both sides of the mattress edge. Should you spot anything, keep going with calm focus.
Examine Tags And Tufts
A tiny fabric flap can hide a lot more than it looks like. You should lift every tag, then check label care details, stitched edges, and the little folds around tuft origins. These spots give bed bugs a safe pause, so take your time and use a flashlight.
| Spot | What you could see |
|---|---|
| Tags | Dark specks, eggs, or tiny shells |
| Tufts | Rust marks or live bugs |
| Stitch lines | Smears that look like ink |
After that, run a flat card under each fold and around any zipper. Should you find one clue, stay calm. You’re not alone in this. Keep moving in a slow circle, because bugs often hide near the tag and tufting together. Small checks build big peace.
Use a Flashlight and Credit Card
Whenever you’re checking a mattress for bed bugs, a flashlight and a credit card can make the job much easier. Use a battery powered flashlight to angle light into seams, folds, and tiny gaps, then keep a sharp edged probe ready to lift what your eyes can’t reach. You’re not alone in this process; many people miss bugs initially, so slow, careful checking helps.
- Shine the light across the fabric and watch for dark specks, shed skins, or tiny pale eggs.
- Slide the credit card along tight spots to open concealed spaces.
- Recheck any area that looks stained or crumbly.
As you move, stay calm and steady. A careful pass gives you better control and helps you spot trouble before it spreads.
Inspect the Mattress Edges
Now focus on the mattress edges, because bed bugs love to hide where the fabric bends, folds, and meets the frame. Run your flashlight slowly along every side, and use the credit card to lift the edge just enough to see inside the seam. Look for dark specks, tiny eggs, shed skins, or rusty spots.
Should you spot damage, make a record of it for fabric fray repair, since loose threads can hide more pests. During mattress edge cleaning, keep the surface dry and gentle so you don’t spread debris around. Check the corners twice, as bugs often cluster there. A calm, careful sweep helps you feel in control, and that matters whenever you want your room to stay a place where you can rest easy.
Check the Box Spring and Frame
Lift the mattress and check the box spring next, because bed bugs often hide there after they leave the seams you just inspected. You’re not alone in this step, and a careful check can help you feel more confident. Use your flashlight and run it along the corners, dust cover, and any loose fabric.
Then follow this simple path:
- Inspect the wooden slats for gaps and tiny hiding spots.
- Check the metal framefasteners, screw holes, and joints.
- Look behind the headboard and where the bed meets the wall.
Move slowly and use a flat card to open tight cracks. Should you spot anything odd, stay calm and keep going. A steady method helps you protect your sleep space and feel in control.
Spot Bed Bug Stains and Droppings
Look closely at the mattress for dark rust-brown or black stains, since those spots can be bed bug droppings.
You might also see tiny rusty red marks where bugs got crushed, and they often show up along seams, folds, and corners.
Should you spot smears on your sheets or mattress cover, use them as a clue to check that area more carefully.
Identifying Dark Stains
Dark stains are one of the clearest clues you can find while checking a mattress for bed bugs, and they often show up before you ever spot a live bug.
Whenever you look closely, you’ll see tiny black or brown dots near seams, tags, and corners. Use stain differentiation so you don’t confuse them with dirt or spilled drink marks. Then follow this quick check:
- Press a damp white cloth on the spot.
- Watch for a reddish-brown smear.
- Compare it with nearby marks and fabric wear.
If the stain looks like pepper and smudges, it’s worth attention. Keep calm; you’re not alone in this.
After that, record the area and move on to laundry treatment for nearby bedding, since fresh cleaning can help you track what’s spreading and what isn’t.
Noticing Rusty Spots
Rusty spots on a mattress can feel unsettling, but they’re often one of the easiest bed bug clues to spot provided you know what to watch for. You’re not alone should they make you pause; many people originally notice these marks before they see anything else. Use a flashlight and check seams, tufts, and corners closely.
| Clue | What it might mean |
|---|---|
| Rusty red dots | crushed bugs or droppings |
| Dark specks | fecal stains |
| Smears that spread | fresh residue |
| Small clusters | concealed activity nearby |
These rusty spot causes aren’t usually from metal stain myths. Beds can stain from bug waste, tiny blood spots, or shed skins. Should the marks look peppery or smear when damp, trust that signal and keep inspecting with care.
Checking Sheet Marks
Sheet marks can tell you a lot before you spot a live bug, so check them closely whenever you strip the bed. Look for dark freckles, rusty smears, or tiny black dots along thread patterns, seams, and folded edges.
These marks can hide in plain sight, and they often show up where your body rests most. To stay on track, use this quick check:
- Inspect the top sheet near the pillow area.
- Lift corners and follow each seam.
- Note any spots that smear during laundry handling.
If you find stains, keep the bedding separate and wash it in hot water. Then inspect the mattress again, because fresh marks can mean bugs are still nearby. Staying calm helps here. You’re not alone, and a careful check can bring real peace of mind.
Find Eggs, Shells, and Live Bugs
Look closely at the mattress seams and corners, because that’s where bed bug eggs, shed shells, and live bugs usually hide initially. Use a flashlight and a magnifying glass, then scan each seam, tag, and tuft with patience. Tiny white eggs might cling in clusters, while pale shells look like empty, papery copies of the bugs.
Should you spot dark specks or rusty smears, check them again for microscopic identification, since they could be waste or crushed insects. A credit card can help lift fabric edges and expose concealed spots.
In the event you find live bugs, don’t panic; you’re not alone, and many people catch them at an early stage. Mark the area, seal bedding away, and plan heat treatment or another control step soon.
Inspect Nightstands, Headboards, and Walls
Once you’ve checked the mattress, move on to the nearby pieces that bugs use as safe hiding spots. You’re not just looking for clutter; you’re checking the places that help bed bugs stay close to you. Use a flashlight and scan slowly.
- Open nightstand drawers and check corners, seams, and handles, especially provided drawer organization feels crowded.
- Look behind the headboard and along wall mounted shelving, where tiny gaps can hide bugs and dark specks.
- Inspect baseboards, wall cracks, and the bed’s wall contact area for shed skins, spots, or live bugs.
In the event you share the room with family or roommates, this step helps everyone feel safer. Move items carefully, and keep your focus on tight spaces where bed bugs like to settle near resting spots.
What to Do If You Find Bed Bugs
Should you spot bed bugs on the mattress, stay calm and act quickly so they don’t spread any farther. Bag bedding right away, then wash and dry it on high heat. Vacuum the mattress seams, bed frame, and floor, and empty the vacuum outdoors. Next, seal the mattress in an encasement and keep the room simple while you arrange professional extermination.
| Step | Why it helps |
|---|---|
| Isolate bedding | Limits movement |
| Clean with heat | Kills concealed bugs |
| Vacuum carefully | Removes adults and eggs |
| Call help fast | Reduces stress and risk |
This matters for your comfort and for any legal implications should you live in shared housing. You don’t need to handle this alone. Bring in your household, tell them what you found, and let them assist you track the next move.
Prevent Bed Bugs From Coming Back
Just as essential as cleaning up a bed bug problem is keeping it from coming back, because these pests love to sneak in once they get the chance. You can stay ahead with a few steady habits that help your room feel safe again.
- Wash bedding often and dry it on high heat.
- Use mattress encasements so bugs can’t hide in seams.
- Keep up with regular vacuuming around the bed, baseboards, and nearby furniture.
Next, reduce clutter so bed bugs have fewer places to slip into, and check secondhand items before they enter your home.
Should you travel, inspect luggage and unpack right away. You’re not alone in this. Small routines like these help protect your space and make it harder for bed bugs to settle back in.
Frequently Asked Questions
How Often Should I Inspect My Mattress for Bed Bugs?
You should inspect your mattress monthly as part of routine checks, and perform seasonal inspections whenever travel, visitors, or nearby infestations raise the risk. You’ll catch problems promptly, feel more in control, and protect your home.
Can Bed Bugs Live in Memory Foam Mattresses?
Yes, they can live in memory foam mattresses, especially along seams and edges, though foam density and heat sensitivity could affect hiding spots. You will want to inspect carefully, since they do not always burrow deep.
Do Bed Bugs Bite During the Day?
Yes, they can, but they usually prefer nighttime because of their nocturnal activity and feeding patterns. If you are seeing bites during the day, you are not alone; bed bugs may still feed whenever you are nearby and resting.
Should I Wash Bedding Before or After Inspection?
Before you wash, inspect initially; after you confirm signs, you’ll want post inspection isolation. Yet pre inspection laundering can help provided you bag bedding carefully. You’re not alone—clean sheets and clear answers go together.
Can Bed Bugs Travel Between Apartments Through Walls?
Yes, they can travel between apartments through walls, shared ventilation, and structural gaps. You are not alone. Seal cracks, alert your landlord, and inspect adjoining units so you can protect your home together.